15 Cute Easy Painting Ideas That Look Adorable
Transform blank canvases into adorable art! Discover 15 cute, easy painting ideas perfect for beginners. From tiny cacti to fluffy clouds.

Ever stared at a blank canvas feeling completely overwhelmed? You're not alone! The fear of that first brushstroke keeps countless creative souls from discovering the pure joy of painting. But what if I told you that creating adorable art is easier than making your morning coffee? Whether you're a total newbie who's never held a paintbrush or someone looking for stress-free creative fun, these painting ideas will have you creating frame-worthy cuteness in no time. Forget about perfection or painting "rules." We're diving into a world where wobbly lines add character and "happy accidents" make your art even more charming. Ready to prove that you don't need years of art school to create something that makes hearts melt? Let's turn those blank canvases into smile-inducing masterpieces!
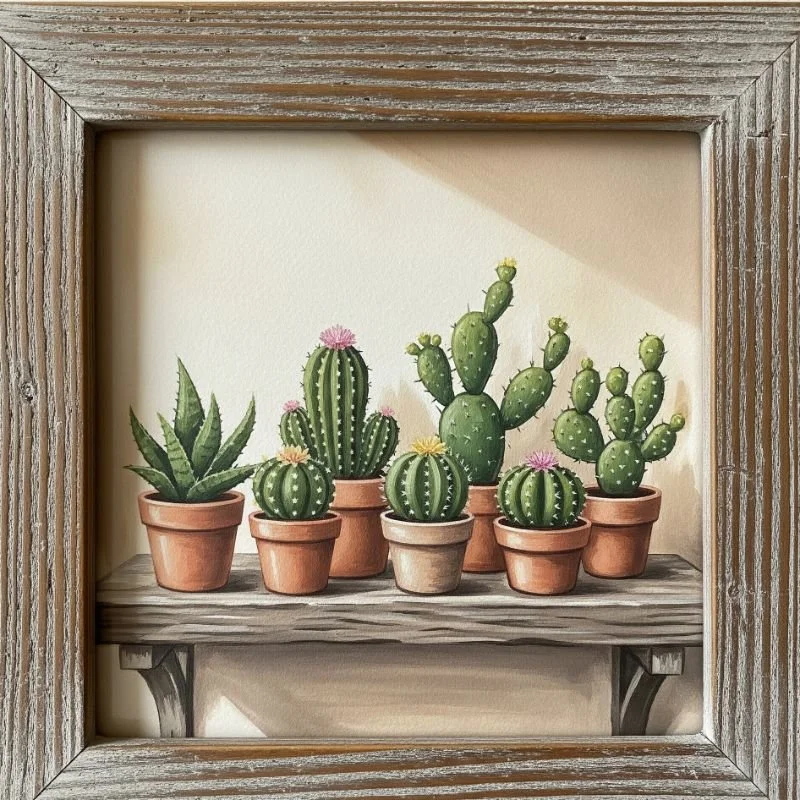
1. Tiny Potted Cacti Collection
Who knew prickly could be so precious? Painting tiny cacti is like creating a garden that never needs watering! Start with simple terracotta pots using basic rectangular shapes with slightly wider tops. Fill them with various cactus shapes: tall columns, round balls, or paddle-shaped varieties. The beauty lies in their simplicity. Use different shades of green and add tiny white dots or lines for spines. Make each cactus unique with small flowers on top using bright pink or yellow dots. Arrange three to five pots in a row for an instant collection. Add personality with decorative pots featuring stripes, polka dots, or geometric patterns. The best part? Wonky shapes make them even cuter! This project teaches color mixing as you create various green hues. Place a simple blue or peachy background to make your desert garden pop.
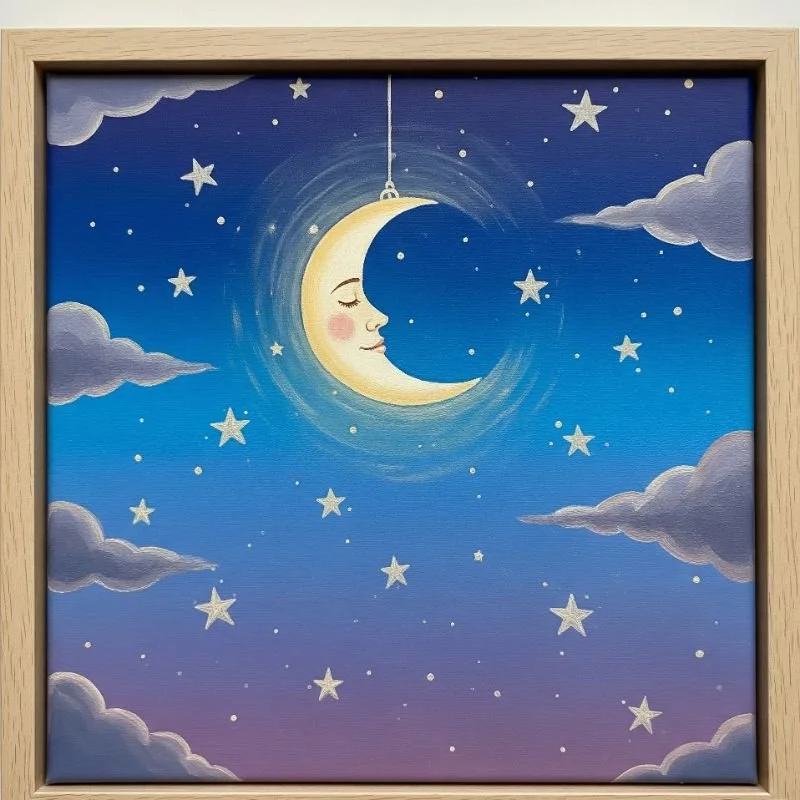
2. Whimsical Moon and Stars
Transform your canvas into a dreamy night sky that sparkles with personality! Paint a crescent moon using a simple curved shape, but give it a gentle face with sleepy eyes and a content smile. Surround your lunar friend with stars of varying sizes. Five-pointed stars work great, but dots and four-pointed sparkles add variety too. Use white or pale yellow paint against a deep blue or purple background for maximum contrast. Add whimsy by giving some stars tiny faces or making them twinkle with radiating lines. Create depth by making distant stars smaller and lighter. For extra magic, dry brush some white paint across the background for a Milky Way effect. This painting works beautifully in nurseries or bedrooms. The forgiving nature of night scenes means any "mistakes" just add to the dreamy atmosphere.
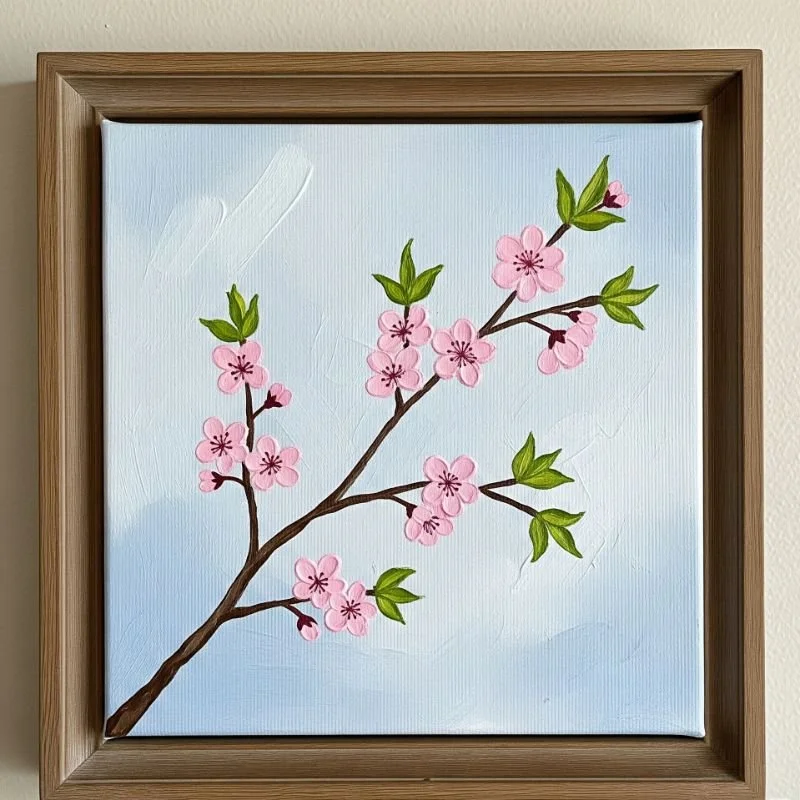
3. Cherry Blossom Branch
Capture spring's fleeting beauty with a cherry blossom branch that blooms eternal on your canvas! Start with a dark brown branch using confident, slightly wobbly strokes. Remember, perfectly straight branches don't exist in nature! Add smaller twigs branching off at angles. Now for the fun part: pink blossoms! Use a flat brush to dab five-petaled flowers in varying shades of pink and white. Some flowers face forward, others show their sides. Add unopened buds using small pink ovals. The secret to authentic-looking blossoms? Layer your colors. Start with darker pink, add lighter pink on top, then finish with tiny white highlights. Scatter some falling petals around your branch for movement. A soft blue or cream background makes the delicate flowers stand out. This painting teaches the beauty of imperfection. Each blossom is unique, just like in real life!
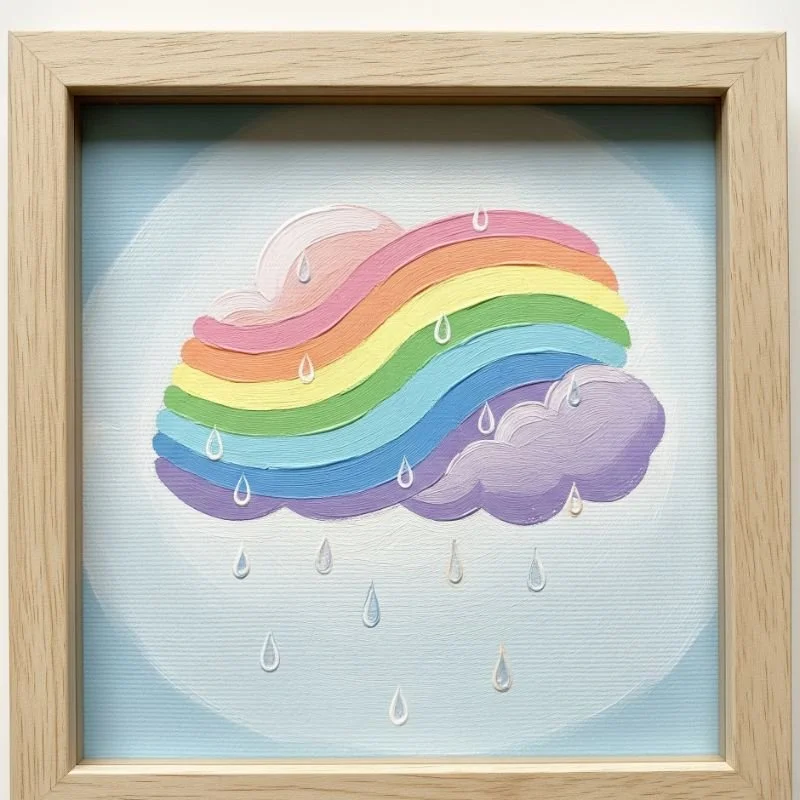
4. Rainbow Cloud with Raindrops
Why settle for ordinary weather when you can paint pure happiness? This cheerful cloud starts as a fluffy white shape made with circular dabbing motions. Give it rosy cheeks and a sweet smile because happy clouds make the best rain! Beneath your cloud, paint a vibrant rainbow using confident arcs. Don't stress about perfect curves; slightly wavy lines add charm. Instead of traditional rain, create colorful droplets in rainbow hues falling from your cloud. Use teardrop shapes in red, orange, yellow, green, blue, and purple. Vary their sizes and angles for natural movement. Add tiny highlights to each drop for dimension. The background can be soft blue or even leave it white for a clean look. This painting spreads joy wherever it hangs. It's perfect for practicing color order while creating something that makes everyone smile. Rainy days never looked so delightful!
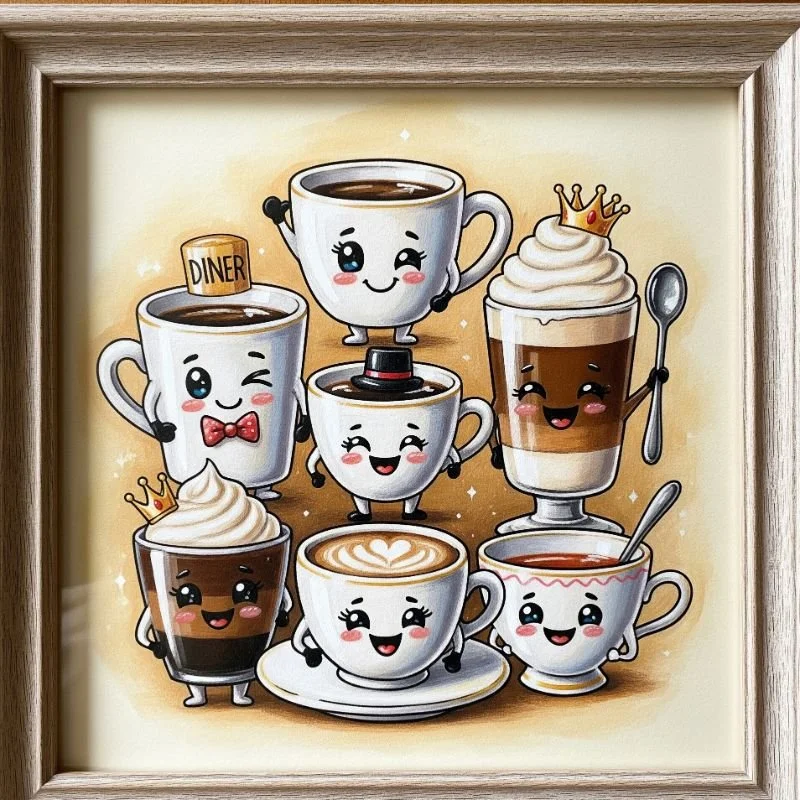
5. Cute Coffee Cup Characters
Turn your caffeine addiction into adorable art with coffee cups that have more personality than your morning barista! Paint simple mug shapes using rectangles with curved bottoms and add handles with "C" shapes. Each cup gets its own face and personality. Sleepy eyes for decaf, wide-awake excitement for espresso, or heart eyes for that perfect latte. Add steam swirls above each cup using loose, curvy lines. Decorate your mugs with patterns: polka dots, stripes, or tiny hearts. Include fun details like marshmallows with faces peeking out of hot chocolate or a cinnamon stick friend. Use warm browns, creamy whites, and soft pastels. Create a coffee shop scene with multiple cups having conversations. This painting celebrates our love affair with warm beverages while practicing facial expressions. Your kitchen will thank you for this cozy artwork!
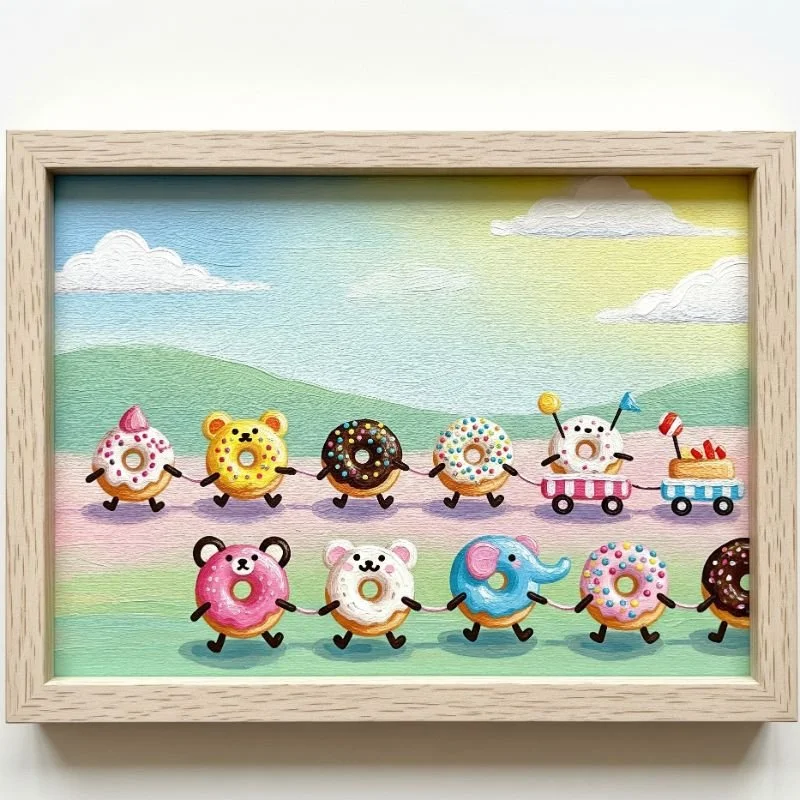
6. Mini Donut Parade
Create a delicious lineup that's calorie-free and forever fresh! Start with basic donut shapes: circles with smaller circles cut from their centers. The magic happens with the toppings. Pink icing, chocolate glaze, rainbow sprinkles, and vanilla drizzle transform simple shapes into treats. Use thick paint for dimensional icing effects. Add personality with tiny faces peeking through donut holes or happy expressions on the icing. Create variety with different decorations: colored sprinkles (tiny lines), chocolate chips (dots), or crushed nuts (small dashes). Line them up in rows or scatter them playfully across your canvas. Pastel backgrounds make the bright colors pop. This painting is perfect for beginners because donuts are forgiving shapes. Uneven circles? That's just homemade charm! Practice color combinations while creating art sweet enough for any space.
7. Sleepy Owl on a Branch
Whooo doesn't love a drowsy owl? This nocturnal cutie starts with a simple egg shape for the body. Add a smaller circle on top for the head, blending where they meet. Create sleepy eyes with downward curved lines and add a tiny orange triangle beak. The key to adorable owls? Big eyes and fluffy textures! Use short, feathery brushstrokes in browns, grays, and whites to create soft plumage. Add wing shapes on the sides with scalloped edges for feather detail. Perch your owl on a simple branch with tiny talons gripping tight. A crescent moon and a few stars complete the nighttime scene. For extra charm, add a tiny sleeping cap or have the owl hugging a miniature pillow. This painting teaches texture techniques while creating a soothing piece perfect for bedrooms. Sweet dreams are guaranteed

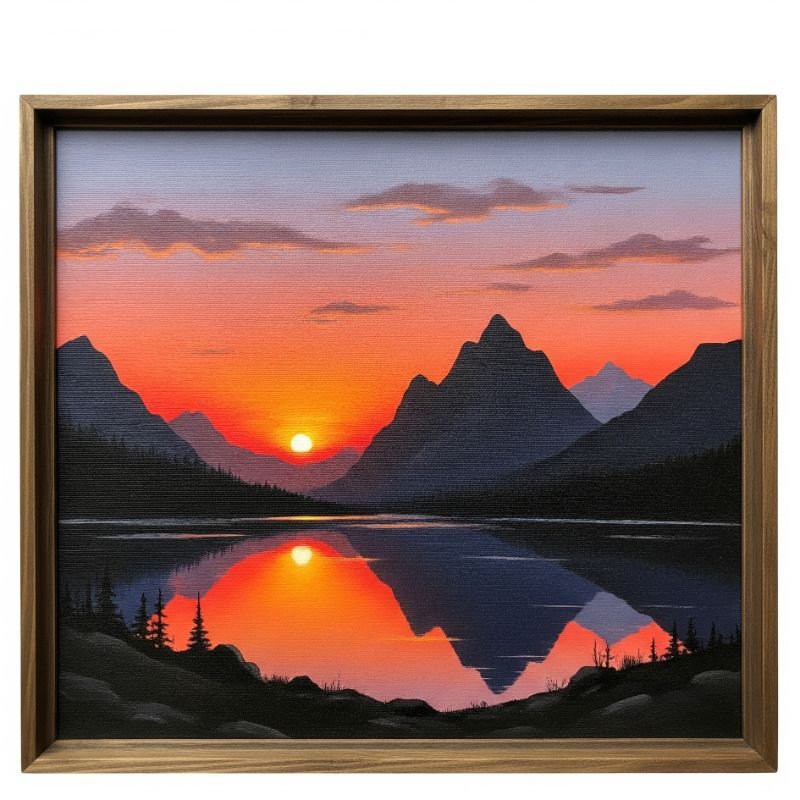
8. Sunset Silhouette Mountains
Master the art of simplicity with mountain silhouettes against a glowing sunset sky! Start by painting horizontal stripes across your canvas in sunset colors: deep purple at top, flowing through pink, orange, and yellow near the horizon. Blend while wet for smooth transitions. Once dry, add mountain shapes using black or dark purple paint. Layer them with tallest peaks in back, smaller ones in front for depth. The jagged edges are easy; just make triangular shapes with uneven tops. Add a few simple pine trees in the foreground using triangular shapes. The contrast between the dark silhouettes and bright sky creates instant drama. This technique is incredibly forgiving since silhouettes hide details. For extra magic, add a few birds flying home as simple "V" shapes. This painting proves that sometimes less really is more
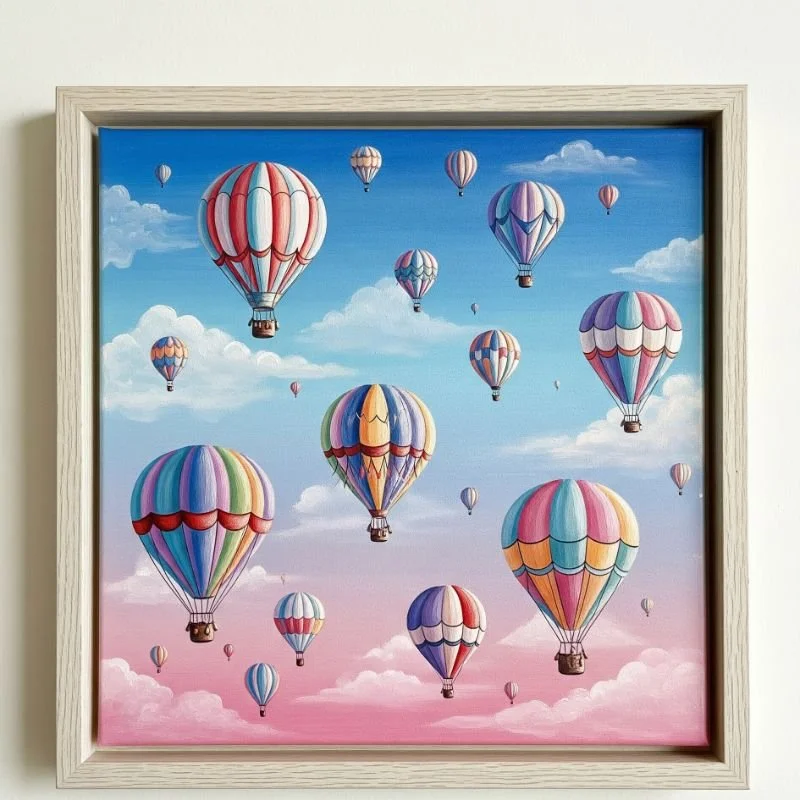
9. Floating Hot Air Balloons
Lift your spirits with whimsical hot air balloons floating across your canvas! Paint teardrop shapes with baskets hanging below, connected by simple lines. Each balloon gets its own personality through patterns and colors. Try stripes, chevrons, polka dots, or rainbow sections. Use bright, cheerful colors that make you happy. The baskets are small rectangles or trapezoids with crisscross patterns. Add tiny stick figure passengers waving from their aerial adventure. Scatter balloons at different heights and sizes for visual interest. Fluffy white clouds become resting spots or obstacles to navigate around. A blue sky background makes colors pop, but sunset skies work beautifully too. This painting celebrates adventure and freedom. The repetitive shapes are meditative to create while allowing endless variety. Float away your worries with each brushstroke. Where are your balloons traveling today?
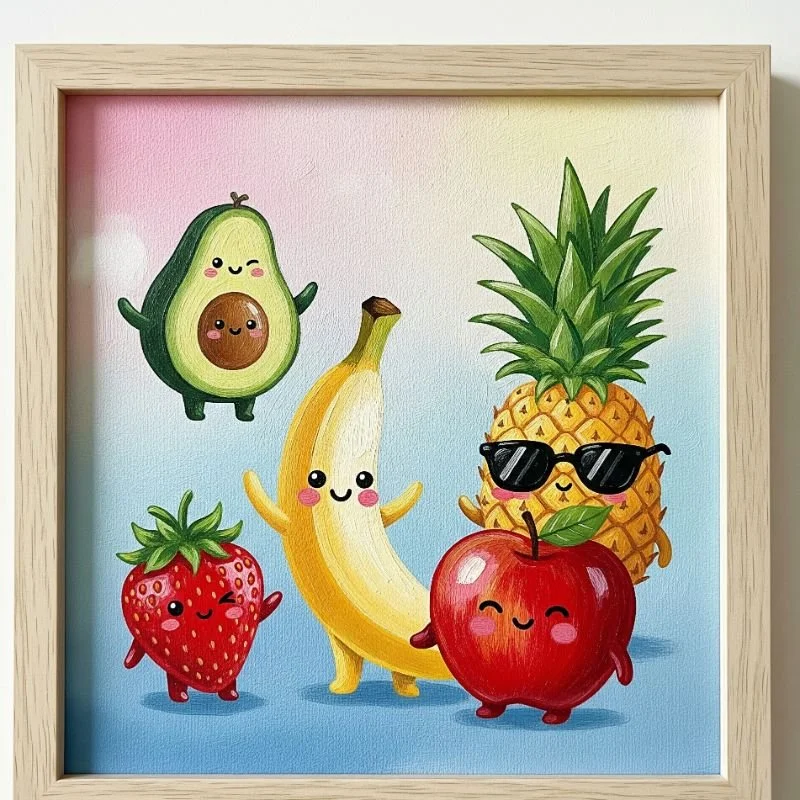
10. Kawaii Fruit Friends
Transform ordinary fruit into extraordinary friends with faces that radiate pure joy! Start with simple fruit shapes: circular oranges, teardrop strawberries, crescent bananas, and oval avocados. The kawaii magic happens with expressions. Add dot eyes, curved smiles, and rosy cheeks to each fruit. Strawberries wear their seeds like freckles, watermelon slices show off their pink insides with black seed smiles, and pineapples rock their spiky crowns like punk hairstyles. Use bright, juicy colors that make mouths water. Add tiny arms and legs for fruits caught mid-dance. Create fruit salad scenes where different fruits hang out together. This painting style celebrates cuteness overload while practicing basic shapes and expressions. Perfect for kitchens or kids' rooms, these fruity friends remind us that healthy eating can be fun.
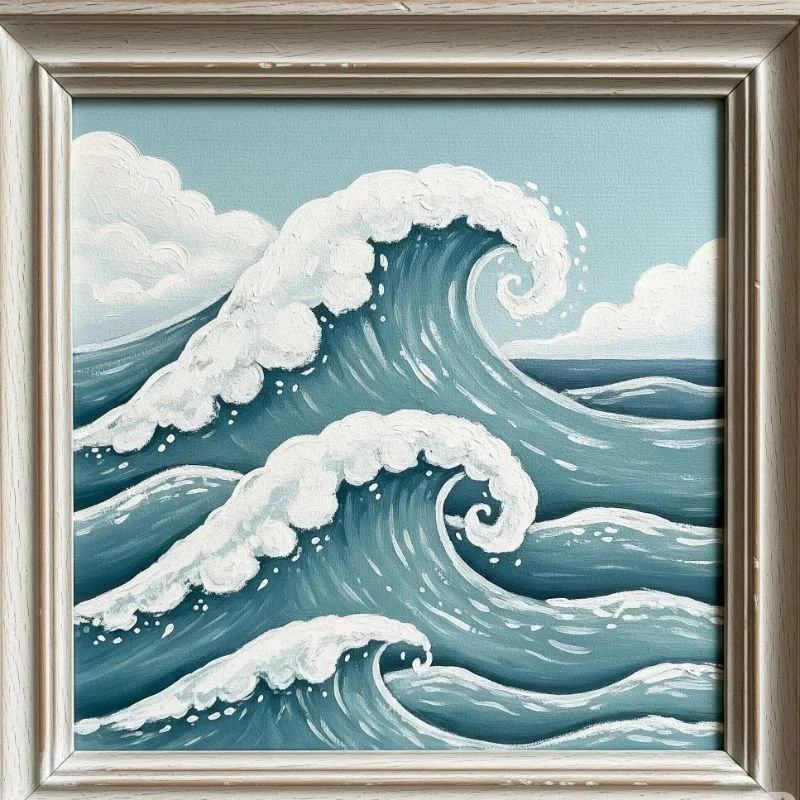
11. Ocean Waves with Foam
Capture the ocean's rhythm with waves that dance across your canvas! Start with horizontal curved lines in varying shades of blue and turquoise. Layer darker blues at the bottom, lighter ones toward the top. The secret to believable waves? White foam caps! Use a dry brush technique with white paint to create frothy tops on each wave. Add movement by making some waves larger, others smaller, some crashing, others gently rolling. Sprinkle sea spray dots where waves meet. For extra detail, add subtle green undertones in the wave shadows. The repetitive motion of painting waves becomes almost meditative. This seascape works alone or as a background for other ocean elements. No two waves are identical, making this perfect for embracing natural variation. Feel the ocean breeze with every brushstroke
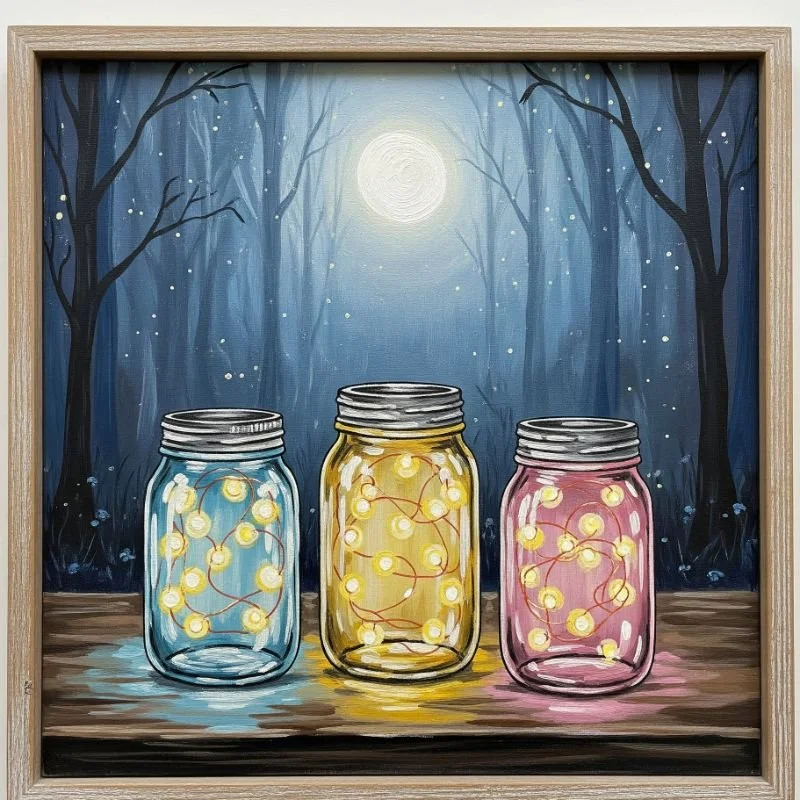
12. Fairy Light Mason Jars
Capture magical moments in painted mason jars that glow with possibility! Paint jar shapes using rectangles with slightly curved sides and add the signature ridged top with horizontal lines. Inside each jar, create a constellation of tiny fairy lights using small yellow and white dots connected by thin gray lines. The lights should look casually tangled, creating beautiful chaos. Add a soft glow effect by dry brushing yellow around each light dot. Decorate jar lids with twine bows or metal details. Create a collection with different colored lights: warm white, multicolor, or soft pink. Place jars on a simple wooden shelf line or floating in dreamy space. This painting brings cozy vibes to any room. The combination of rustic jars and twinkling lights creates instant ambiance. Perfect for those who love farmhouse charm with a touch of magic
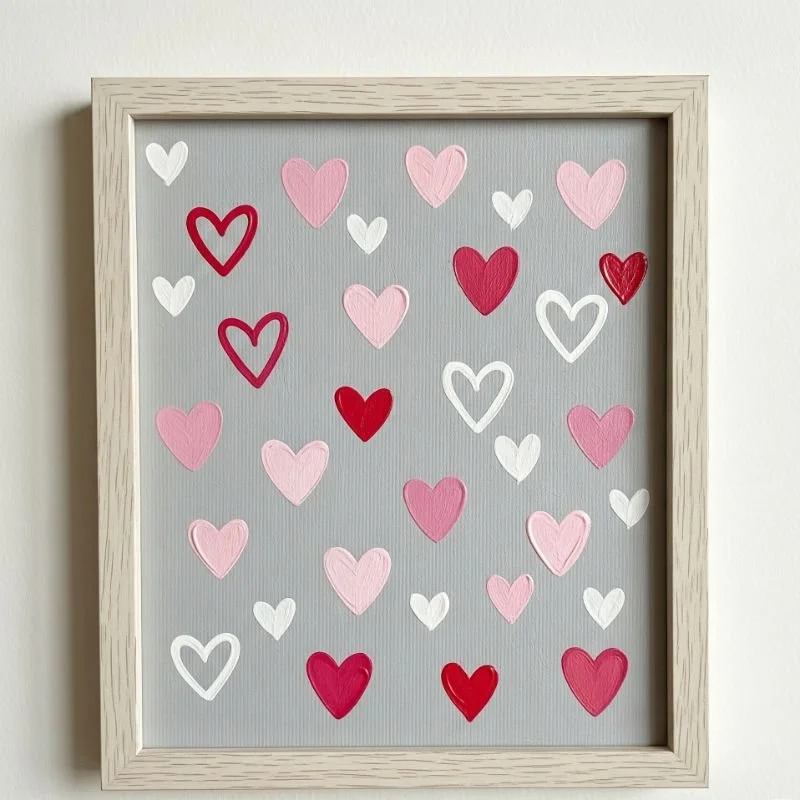
13. Minimalist Heart Patterns
Sometimes the simplest ideas create the biggest impact! Fill your canvas with hearts in various sizes using a cohesive color palette. Try ombre effects with hearts gradually changing from dark to light pink. Create patterns: rows of uniform hearts, scattered confetti-style arrangements, or radiating designs from a central point. Experiment with heart styles: classic curves, geometric angles, or hand-drawn wobbles. Use negative space wisely; not every inch needs filling. Add interest with outline hearts mixed among solid ones. This project teaches color harmony and composition without overwhelming detail. Perfect for Valentine's Day or any day needing extra love. The repetitive nature becomes meditative while allowing creative freedom in arrangement. Hang in bedrooms, nurseries, or anywhere needing a love boost. These hearts prove that minimalism can still pack maximum cuteness
14. Fluffy Sheep in a Field
Count yourself lucky with adorable sheep that look like walking clouds! Create fluffy bodies using circular dabbing motions with white paint, building texture with layers. Add black faces and legs peeking out from all that wool. Simple "U" shapes work for heads, stick legs complete the look. Give each sheep personality: some grazing, others looking curiously at viewers. Dot eyes and tiny smiles make them irresistibly sweet. Set your flock in a green field using various green shades for grass texture. Add small flowers dotting the meadow and maybe a fence line in the background. The beauty of painting sheep? The fluffier and more uneven, the better! This pastoral scene brings calm and whimsy together. Practice creating texture while building a scene that makes everyone want to pet your painted sheep. Sweet dreams are made of these

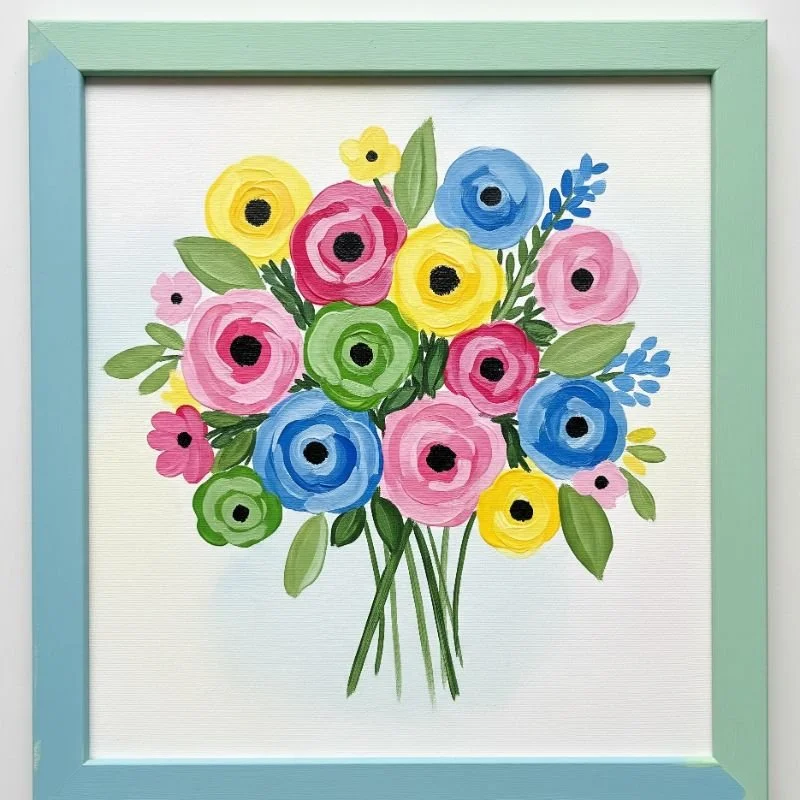
15. Abstract Flower Bouquet
End with a flourish by creating blooms that break all the rules! Forget botanical accuracy; this bouquet celebrates pure creative joy. Use bold brushstrokes to create flower shapes: circles, spirals, stars, or completely invented forms. Layer colors while wet for beautiful blending. Stems can be straight, curved, or wildly dancing across your canvas. Mix realistic elements with pure abstraction. Maybe one flower has geometric petals while another swirls like a pinwheel. Use your favorite colors without worrying about what flowers "should" look like. Add leaves as simple shapes or energetic splashes of green. This painting gives permission to play. No two flowers need matching, and "mistakes" become unique features. The result? A bouquet that never wilts and always brings smiles. Perfect for adding personality to any space while building confidence in abstract techniques
Conclusion
Creating cute paintings isn't about perfection; it's about spreading joy through simple brushstrokes and cheerful colors. These 15 ideas prove anyone can make adorable art that brightens spaces and spirits. So grab those brushes, embrace the wonky lines, and remember: the cutest paintings are made with confidence and joy, not precision. Your walls are waiting for their dose of handmade happiness!
Read next: 15 Cute Drawing Ideas That Will Melt Your Heart
Frequently Asked Questions
Q1: What paint type works best for beginners?
Acrylic paints dry quickly, blend easily, and clean up with water. Perfect for starters!
Q2: Do I need expensive brushes to start?
Basic synthetic brushes in various sizes work wonderfully. Quality matters less than practice.
Q3: How do I fix painting mistakes?
With acrylics, simply paint over dried areas. Remember, "mistakes" often add character!
Q4: What surface should I paint on?
Canvas boards, paper, or wood panels all work great for these beginner-friendly projects.
Q5: How long does each painting take?
Most projects take 30-60 minutes, perfect for afternoon creativity or evening relaxation sessions.
Stay up to date with our latest ideas!