15 Easy Pot Painting Ideas for Cute Planters
Transform plain terracotta pots into stunning planters with these 15 easy pot painting ideas perfect for beginners and craft lovers alike.

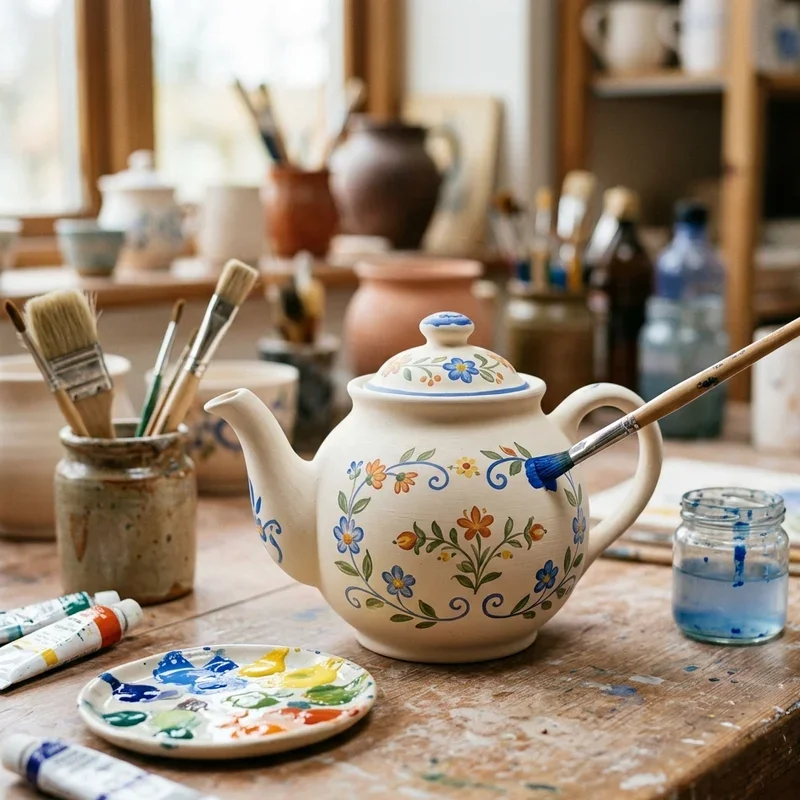
Have you ever looked at a plain terracotta pot and thought it desperately needed a personality makeover? You are definitely not alone in this creative struggle that many gardeners and craft enthusiasts face daily. Pot painting has become one of the most satisfying DIY projects that anyone can tackle, regardless of artistic skill level or previous experience. Think of those boring clay containers as blank canvases waiting for your imagination to run wild and express your unique style. Whether you want to add vibrant color to your patio, create personalized gifts for friends, or simply enjoy a relaxing afternoon craft session, painting plant pots offers endless possibilities for creativity. From simple geometric patterns to whimsical animal faces, these easy pot painting ideas will transform your garden into an Instagram worthy paradise.
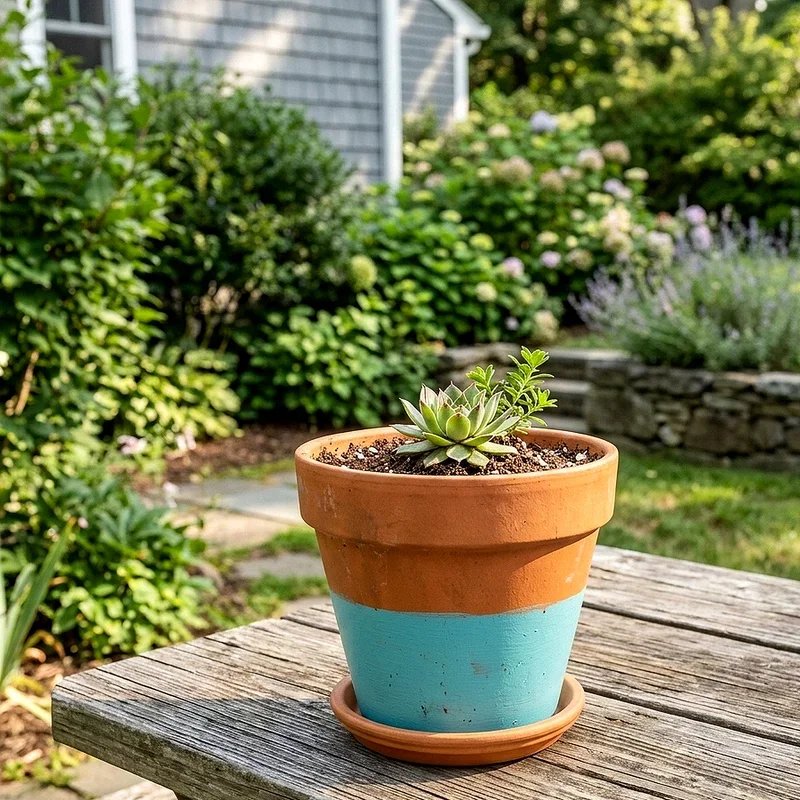
1. Classic Terracotta with a Colorful Dip
Sometimes the simplest ideas produce the most stunning results, and dip dyed pots prove this theory perfectly every single time. This technique involves literally dipping the bottom portion of your pot into paint to create a clean, elegant two toned effect that looks professionally done. Choose a bold color like coral, turquoise, or sunny yellow that contrasts beautifully against the natural terracotta shade for maximum visual impact. Pour your paint into a container slightly larger than your pot, then submerge the bottom third at an angle for interesting variations and unique designs. The beauty of this method lies in its forgiving nature because uneven lines actually add character and charm to your finished creation effortlessly.
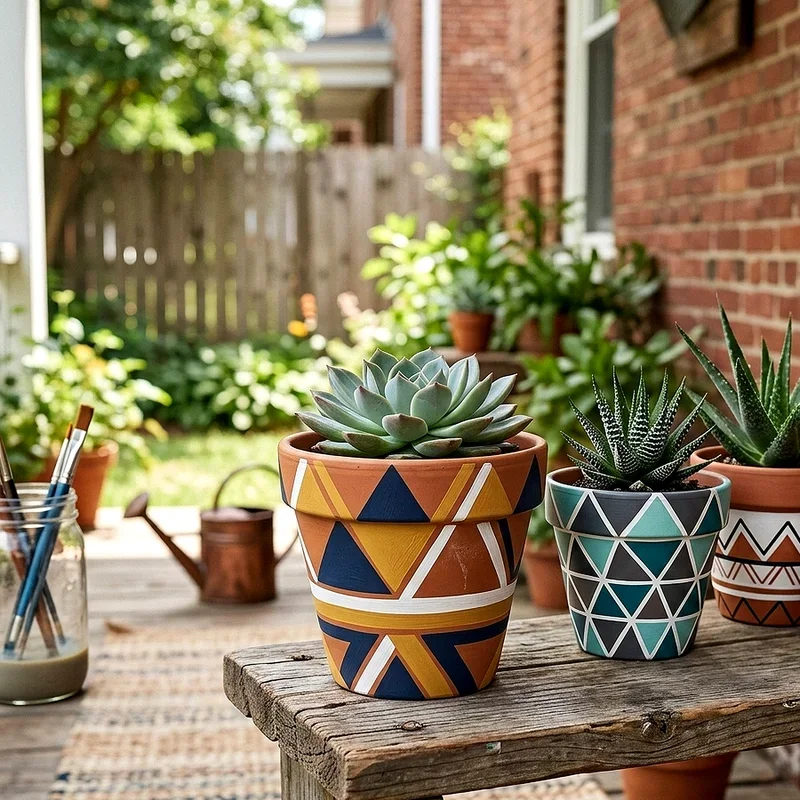
2. Geometric Patterns for Modern Appeal
Geometric designs bring contemporary sophistication to your garden without requiring advanced artistic skills or expensive supplies whatsoever. Using painter tape, you can create triangles, stripes, chevrons, diamonds, and countless other angular patterns with precision and clean lines. Start by painting your entire pot a base color and letting it dry thoroughly before applying tape in your desired pattern carefully. Press the tape edges firmly to prevent paint from bleeding underneath and ruining your crisp lines. Apply your contrasting colors confidently, then peel away the tape while paint remains slightly wet for the sharpest edges possible. The mathematical precision of geometric patterns provides satisfying visual contrast against organic plant shapes in your garden beautifully.
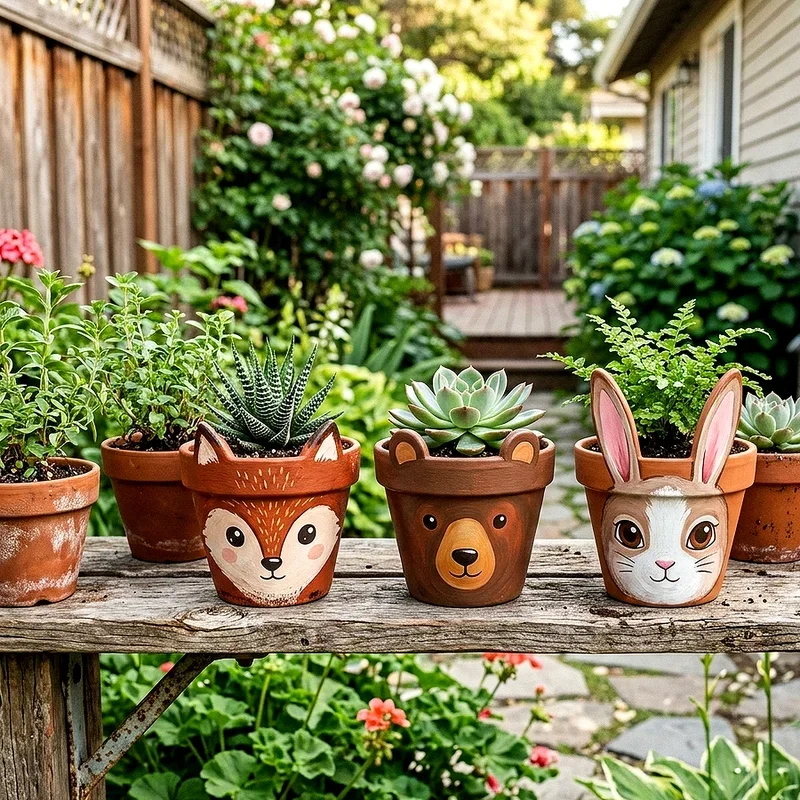
3. Whimsical Animal Face Pots
Nothing brings more joy to a garden than cute animal faces peeking out from between your beloved plants and colorful flowers. These playful designs work especially well for children rooms, nurseries, or anyone who appreciates a touch of whimsy in their decor style. Start with a solid base color appropriate for your chosen animal, whether orange for a fox, pink for a pig, or gray for a koala bear. Add simple features like eyes, noses, ears, and whiskers using contrasting colors and a steady hand for best results. Do not stress about perfection because slightly imperfect features actually make these characters more endearing and charming. These adorable creations make wonderful handmade gifts for plant loving friends and family members.
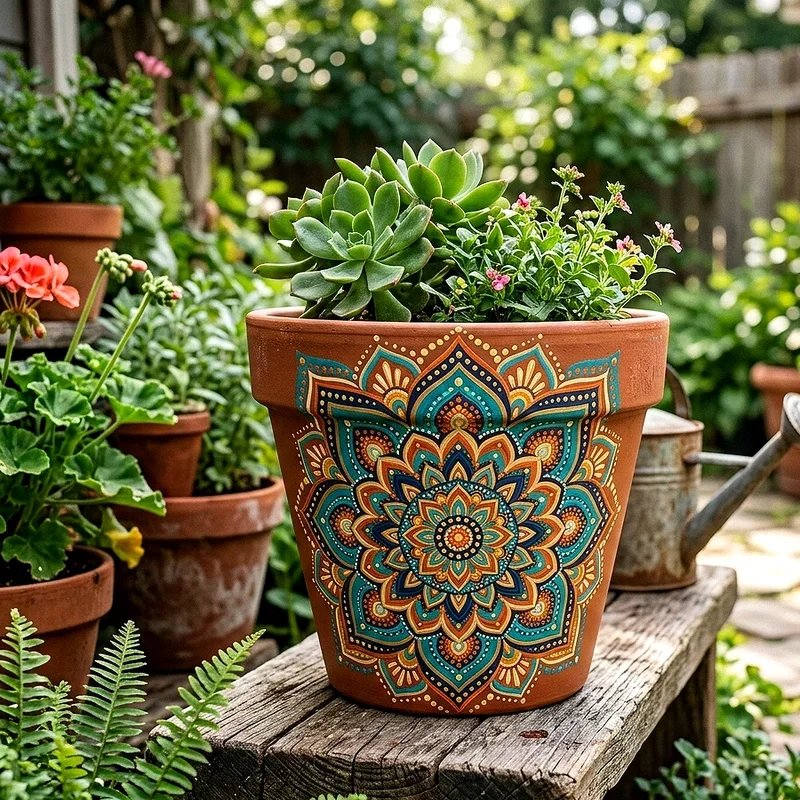
4. Bohemian Mandala Designs
Mandala patterns tap into something deeply meditative and satisfying about creating repetitive, symmetrical designs on beautifully rounded surfaces. These intricate circular patterns originating from ancient spiritual traditions translate beautifully onto plant pots, adding an artistic bohemian vibe to any space instantly. Begin by marking a central point and working outward in concentric circles, adding petals, dots, and geometric shapes as you expand your design. White paint on terracotta creates stunning contrast, though colorful mandalas on black or navy backgrounds look equally impressive and eye catching. Use dotting tools, cotton swabs, or the back end of paintbrushes to create consistent circular elements throughout your design effortlessly. Each pot becomes a unique meditation in paint and creativity.
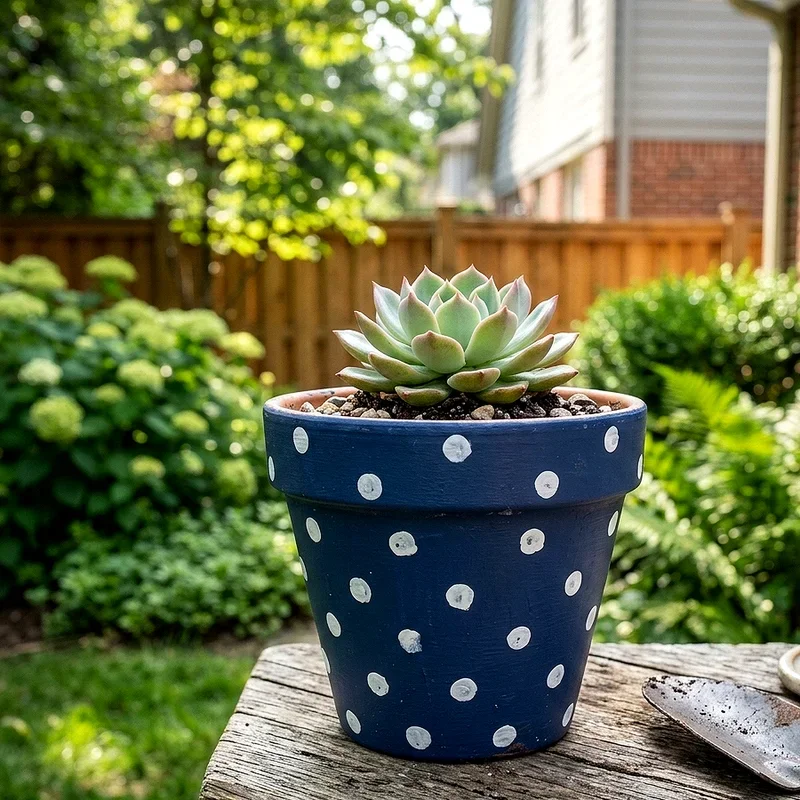
5. Simple Polka Dot Perfection
When in doubt, polka dots never fail to deliver cheerful, stylish results that brighten any space instantly with their timeless appeal. This beginner friendly technique requires nothing more than paint, a round object for stamping, and a steady hand for careful placement. Use pencil erasers, wine corks, dowel rods, or dedicated dotting tools to create perfectly round circles in various sizes across your pot surface easily. Stick with a single color for classic elegance or go wild with rainbow dots for maximum visual impact and playful fun. Spacing dots evenly creates an organized, polished appearance while random placement feels more playful and organic in nature. This technique works wonderfully for creating matching pot sets for gifts or events.
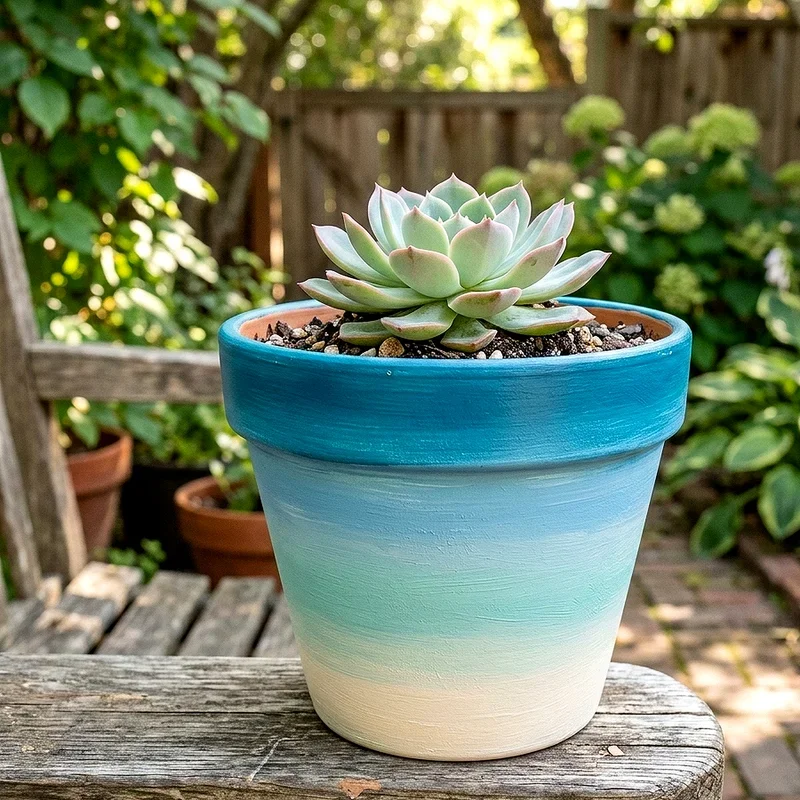
6. Ombre Gradient Magic
Ombre effects create a dreamy, watercolor quality that makes pots look far more expensive and sophisticated than their humble DIY origins suggest. This gradient technique involves blending colors seamlessly from light to dark or transitioning between two completely different hues entirely for stunning effects. Start with your lightest shade at the top and gradually add darker tones as you work downward, blending the transition zone while paint remains wet. The key to successful ombre lies in working quickly before paint dries and being completely unafraid to experiment with various blending techniques. Sunset inspired gradients moving from yellow through orange to pink look absolutely magical in any garden setting. These pots become stunning focal points that draw admiration from visitors.
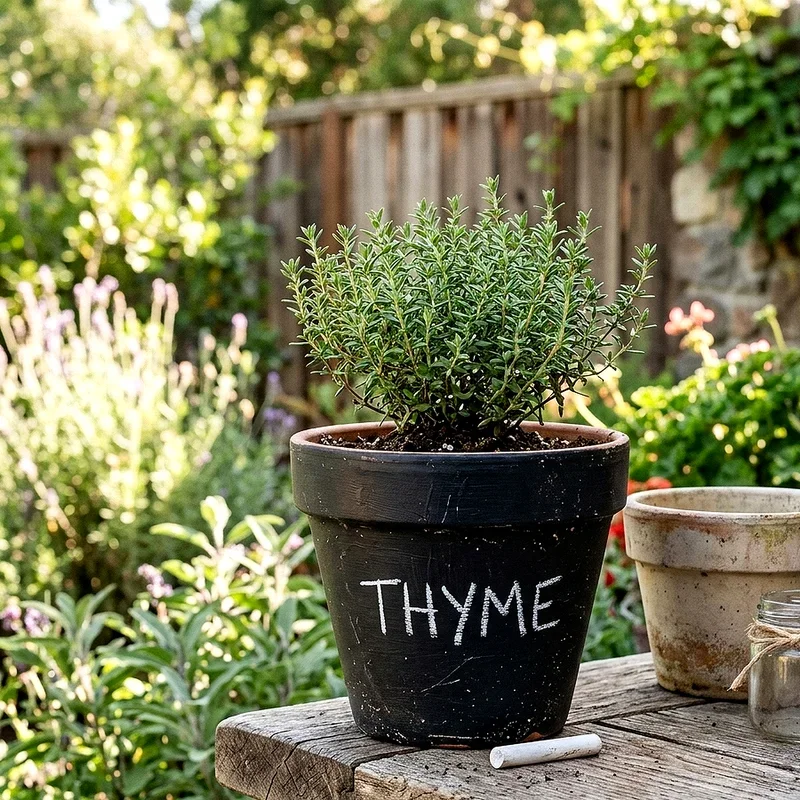
7. Chalkboard Paint for Customizable Labels
Chalkboard paint transforms ordinary pots into practical and adorable herb markers or customizable display pieces perfect for any occasion or season. Apply two or three coats of chalkboard paint to your pots, allowing proper drying time between each application for the best possible results. Once fully cured, you can write directly on the surface with regular chalk or chalk markers to identify plants or add decorative seasonal messages. This technique proves especially useful for kitchen herb gardens where quickly identifying rosemary from thyme saves valuable time during busy cooking sessions. Consider painting only a decorative banner section with chalkboard paint rather than the entire pot for a more stylish and elegant appearance overall.
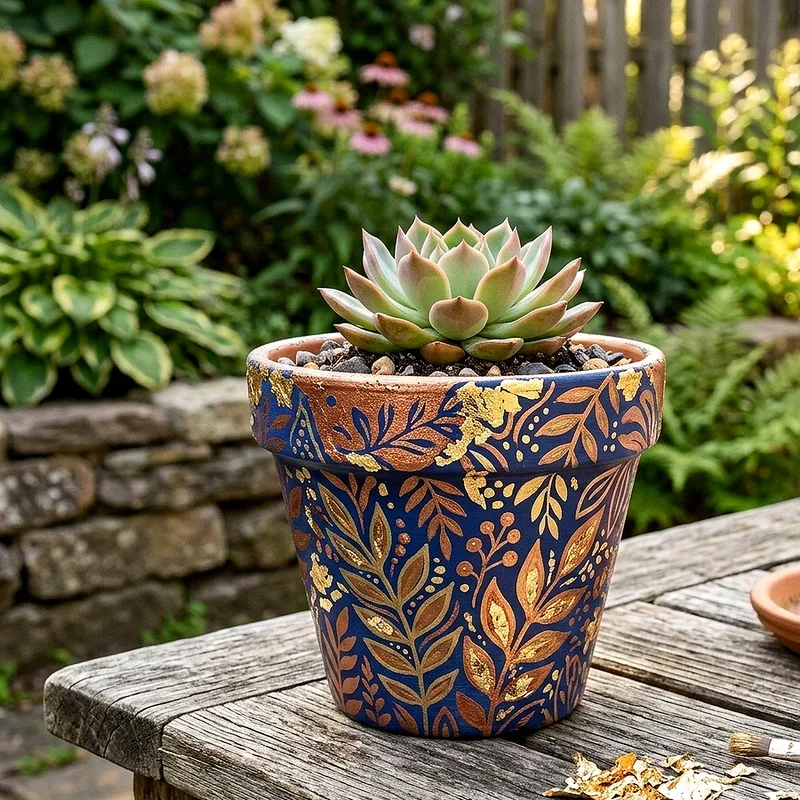
8. Metallic Accents and Gold Leaf Details
Adding metallic elements instantly elevates simple painted pots from basic craft project to boutique worthy home decor status in moments. Gold, silver, copper, and rose gold paints catch light beautifully and add luxurious shimmer to any design scheme or color palette you choose. Apply metallic paint to pot rims, create geometric shapes, or paint entire pots for maximum glamour, sophistication, and visual impact. Gold leaf application requires adhesive and careful handling but produces an authentic antique appearance that paint alone simply cannot replicate effectively. Combine metallics with matte colors for stunning contrast, like black pots with gold geometric patterns or crisp white bases with elegant copper drip effects.
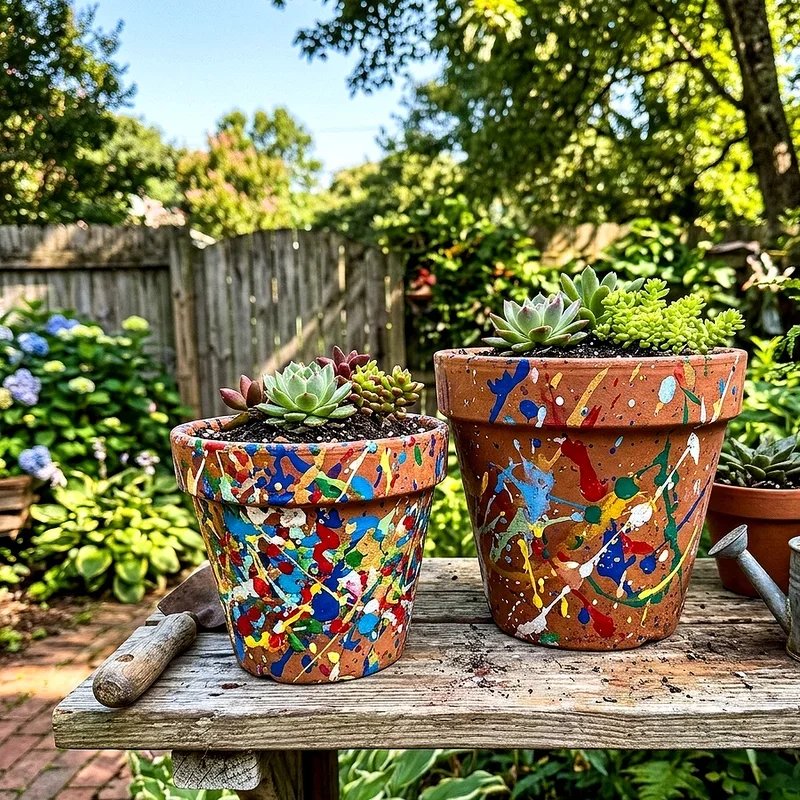
9. Abstract Splatter Art Pots
Channel your inner Jackson Pollock with this liberating technique that celebrates controlled chaos and spontaneous creativity in the most beautiful way. Splatter painting involves flicking, dripping, or spattering paint onto pot surfaces to create dynamic, energetic patterns full of movement, life, and artistic expression. Protect your work area thoroughly because this method gets messy fast, but that wonderful messiness is absolutely part of the fun and freedom. Load a brush with thinned paint and flick it toward your pot from various angles and distances to create different sized droplets and effects. Each pot becomes completely unique since replicating exact splatter patterns proves virtually impossible even if you intentionally tried to do so.
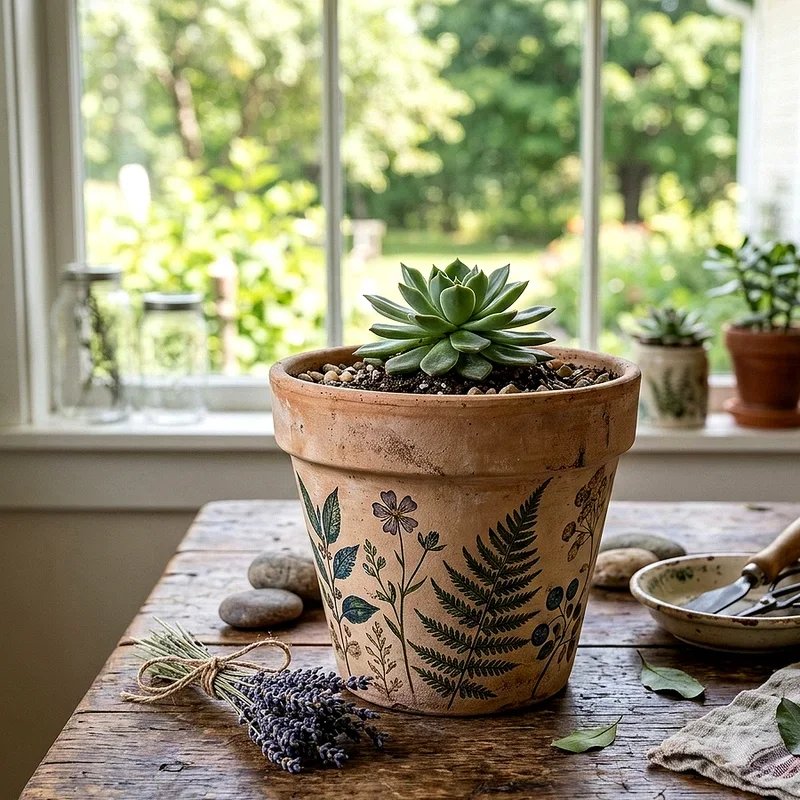
10. Nature Inspired Botanical Prints
Bring the beauty of nature onto your pot surfaces by painting delicate leaves, flowers, vines, and botanical elements directly onto your containers beautifully. Simple leaf shapes, trailing ivy patterns, or scattered wildflower designs connect your planters thematically to the living plants they hold inside them perfectly. Start with basic silhouette shapes before attempting more detailed botanical illustrations, working your confidence upward gradually over time with practice. Use real leaves as stamps by coating them with paint and pressing firmly onto pot surfaces for authentic natural impressions and textures. Monochromatic botanical designs in sage green or navy create sophisticated appearances while colorful flower patterns feel more cheerful and garden party ready for entertaining.
11. Textured Techniques with Household Items
Why limit yourself to ordinary brushes when your home contains countless everyday objects capable of creating fascinating textures and unique patterns? Sponges produce mottled, organic textures perfect for faux stone or aged patina effects on ordinary terracotta containers with minimal effort required. Bubble wrap stamps create uniform circular patterns, while crumpled plastic bags add random, abstract textures that look incredibly sophisticated and intentionally artistic. Try dragging combs through wet paint for grooved designs or pressing lace fabric against tacky paint for delicate raised patterns beautifully. Old credit cards work brilliantly for scraping dramatic striped effects across surfaces. The beauty of textured techniques lies in their wonderful unpredictability and completely unique results every time.
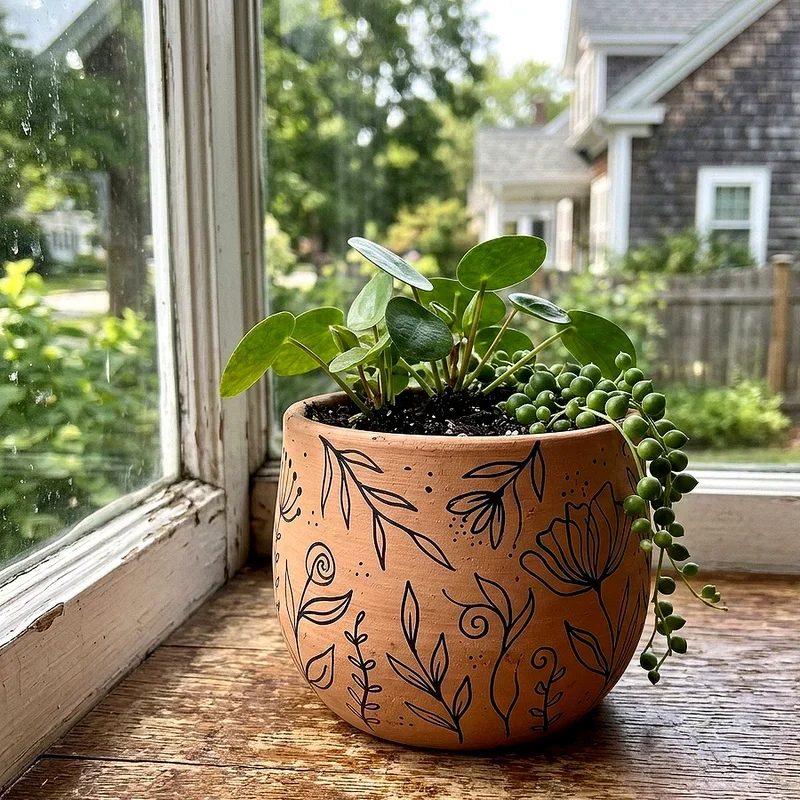
12. Minimalist Line Art Designs
Minimalist line art has taken the design world by storm, and translating this popular aesthetic onto plant pots creates timelessly elegant results effortlessly. Using a thin brush or paint pen, draw simple continuous line illustrations like faces in profile, abstract figures, or flowing organic shapes with confidence. The beauty of this style lies in its simplicity because a single unbroken line can suggest complex forms without overwhelming detail or visual clutter. Black lines on white or natural terracotta backgrounds create classic, gallery worthy pieces that complement any interior design style beautifully and seamlessly. Practice your designs on paper first to build confidence and muscle memory before committing brush to pot for final creations.
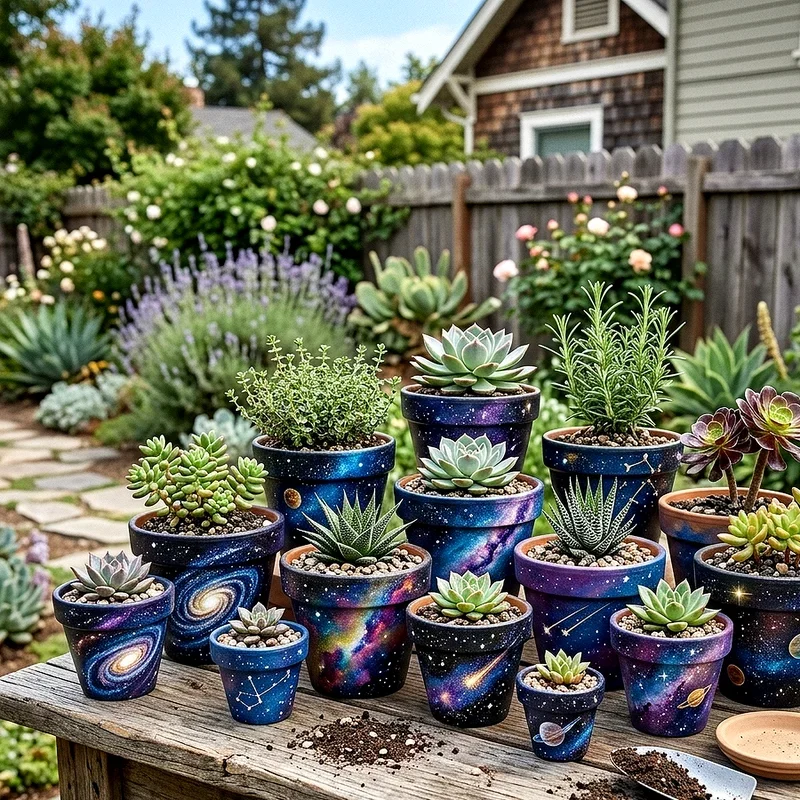
13. Galaxy and Cosmic Themed Pots
Transform ordinary containers into windows to the cosmos with mesmerizing galaxy themed painting techniques that capture universal wonder and celestial beauty perfectly. Begin with a black base coat, then sponge on deep purples, blues, and touches of pink to create nebula clouds and cosmic atmosphere effects. Add tiny white dots with a fine brush or toothbrush splatter technique to represent distant stars scattered across the infinite darkness of space. Larger dots in silver become prominent stars or distant planets, while swirls of lighter colors suggest spinning galaxies far away. Apply glitter sealant for extra sparkle that mimics the twinkle of actual stars in clear night skies beautifully.
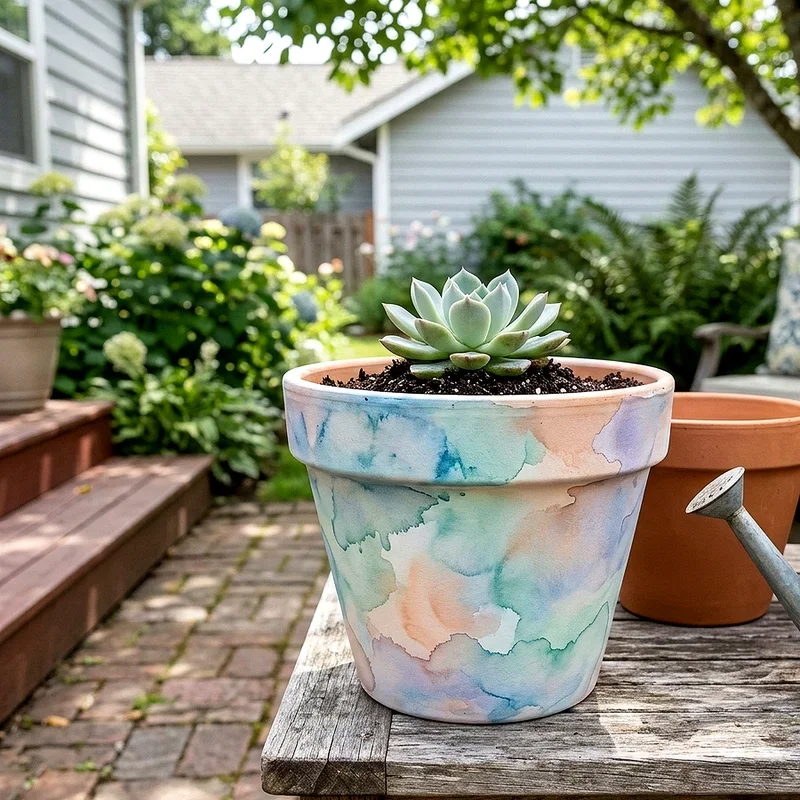
14. Watercolor Wash Effect Pots
Watercolor wash techniques create ethereal, dreamy effects that make your pots look like they belong in a prestigious art gallery exhibition display. This method mimics the soft, flowing quality of traditional watercolor paintings by using diluted acrylic paints applied in loose, overlapping layers beautifully. Start by wetting your pot surface slightly, then apply watered down paint and let gravity pull colors downward naturally for beautiful dripping effects. Tilt your pot in different directions to guide paint flow and create organic patterns that appear effortlessly artistic and professionally sophisticated. Soft pastels like blush pink, lavender, and mint green work beautifully together, creating romantic looking pots that pair perfectly with delicate trailing plants.
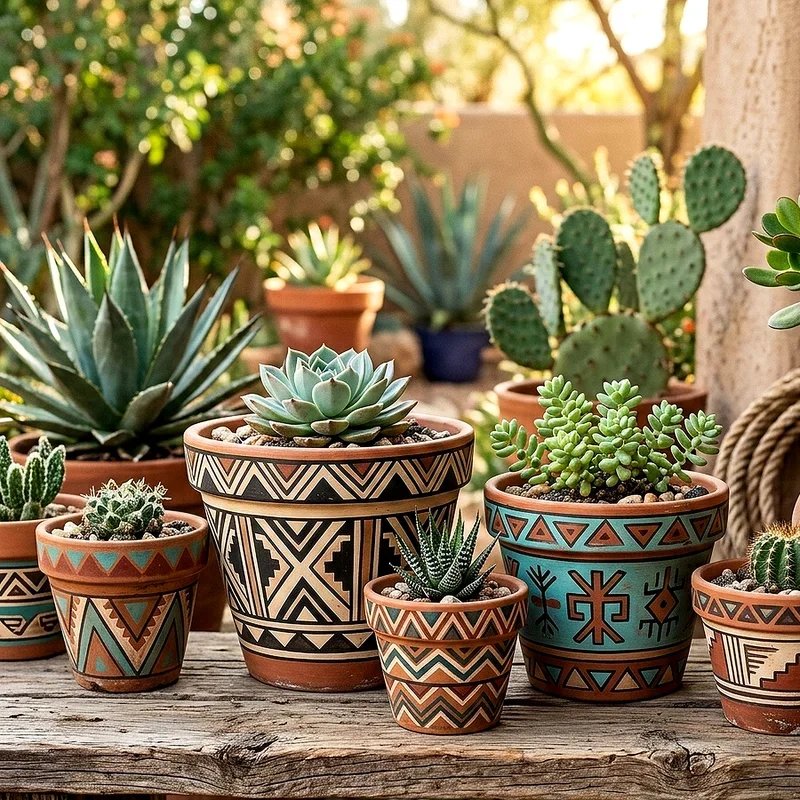
15. Tribal and Aztec Pattern Pots
Tribal and Aztec inspired patterns bring bold graphic energy and cultural richness to your plant pot collection with striking and memorable visual impact. These designs feature strong geometric shapes, zigzag lines, arrows, triangles, and symbolic motifs arranged in repetitive bands around your pot circumference beautifully. Traditional earth tones like terracotta, black, cream, and rust create authentic appearances, though modern interpretations using bright colors work equally stunning and eye catching. Start by sketching your pattern lightly with pencil, dividing your pot into horizontal sections for different design elements and motifs carefully. The bold contrast and strong lines of tribal designs make incredible statement pieces that command attention in any setting instantly.
Conclusion
Pot painting opens up a world of creative possibilities that transform ordinary garden containers into extraordinary works of art reflecting your personality. Whether you gravitate toward sophisticated geometric patterns, playful animal faces, or dreamy galaxy themes, there exists a perfect technique waiting for you to discover and master. These projects require minimal investment yet deliver maximum satisfaction and visual impact throughout your living spaces. Remember that perfection matters far less than the joy found in creating something uniquely yours with your own two hands. So gather your supplies and start transforming those plain pots into stunning planters today.
Read next: 15 Pot Painting Ideas to Brighten Your Garden Space
Frequently Asked Questions
Q1. What type of paint works best for terracotta pots?
A: Acrylic paint adheres best to terracotta and offers durability with endless color options available.
Q2. Do I need to seal painted pots before using them outdoors?
A: Yes, always apply waterproof sealant to protect your artwork from rain and moisture damage.
Q3. Can I paint plastic plant pots using these same techniques?
A: Absolutely, just use plastic primer first to help the acrylic paint adhere properly.
Q4. How long should I wait before planting in freshly painted pots?
A: Wait at least forty eight hours, though one week provides optimal paint curing time.
Q5. Will painted pots harm my plants in any way?
A: No, sealed acrylic paint is non toxic and completely safe for all plant types.
Stay up to date with our latest ideas!